Introduction
When it comes to cooking a delicious meal, the quality of your ingredients can make all the difference. One often-overlooked aspect of preparing meat is the trimming process, especially when it comes to a picnic shoulder. But what exactly is a picnic shoulder? This cut of meat comes from the front leg of the pig and is known for its flavorful and tender qualities. However, to truly bring out the best in this cut, proper trimming is essential.
Trimming a picnic shoulder before cooking serves more than just aesthetic purposes. By removing excess fat and skin, you not only enhance the appearance of the meat but also improve its overall flavor and texture. Additionally, trimming allows for better seasoning penetration and even cooking, resulting in a mouthwatering dish that will have your guests coming back for more. Let’s dive into the benefits of trimming a picnic shoulder properly and how you can master this essential cooking skill.
Understanding the Picnic Shoulder Cut
Explanation of a Picnic Shoulder Cut
A picnic shoulder cut is a flavorful and versatile piece of meat that comes from the front leg of a pig. This cut contains a mix of muscle, fat, and connective tissue, making it ideal for slow cooking methods such as roasting, braising, or smoking. Due to its marbling and rich flavor, the picnic shoulder is a popular choice for barbecue enthusiasts and home cooks alike.
Differentiating the Picnic Shoulder from Other Cuts
What sets the picnic shoulder apart from other cuts of pork is its unique combination of lean meat and fat. Unlike the pork loin or tenderloin, which are leaner cuts, the picnic shoulder has more fat marbling throughout the meat, giving it a rich and juicy flavor when cooked properly. Understanding the differences between cuts of meat can help you choose the right one for your cooking needs and preferences.
Importance of Trimming for a Picnic Shoulder
Trimming a picnic shoulder is essential for several reasons. By removing excess fat and skin, you can control the fat content of the meat and prevent it from becoming greasy or tough during cooking. Trimming also allows for better seasoning penetration, ensuring that the flavors are evenly distributed throughout the meat. Overall, proper trimming sets the stage for a delicious and perfectly cooked picnic shoulder dish.
Tools and Equipment Needed for Trimming
List of Essential Tools
When it comes to trimming a picnic shoulder, having the right tools can make the process much more manageable. Some essential tools you will need include:
- Sharp boning knife: A sharp knife is crucial for precision trimming and removing excess fat.
- Cutting board: A stable surface for working on and protecting your countertops.
- Kitchen shears: Useful for cutting through tough cartilage and tendons.
- Meat thermometer: Ensures your meat is cooked to the perfect temperature.
- Paper towels: Handy for patting dry the meat before trimming.
Importance of Using the Right Tools
Using the appropriate tools for trimming a picnic shoulder is vital for achieving the desired results. A sharp knife will make it easier to trim the fat and skin without damaging the meat. Kitchen shears are great for cutting through tough sections, while a meat thermometer ensures your meat is cooked to perfection, avoiding under or overcooking. Having the right tools not only makes the trimming process more efficient but also helps you achieve a beautifully trimmed picnic shoulder ready for cooking.
Where to Find the Necessary Tools
You can find the necessary tools for trimming a picnic shoulder at your local kitchen supply store, online retailers, or even in some supermarkets. Investing in quality tools will not only make trimming easier but will also last you for many cooking adventures to come. Make sure to choose tools that are comfortable to handle and suitable for the task at hand to ensure a successful trimming experience.
Step-by-Step Guide on How to Trim a Picnic Shoulder
Preparing the Picnic Shoulder for Trimming
Before you begin the trimming process, it’s essential to prepare the picnic shoulder properly. Start by ensuring your work surface is clean and sanitized. Lay out the picnic shoulder and gather all the necessary tools and equipment, including a sharp knife, cutting board, and kitchen shears.
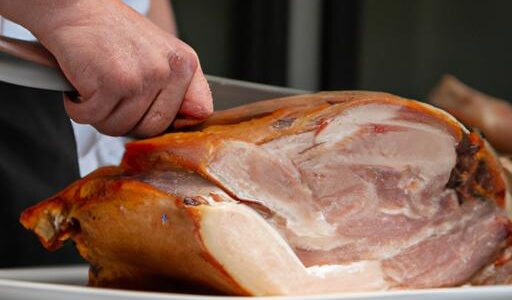
Removing Excess Fat and Skin
The next step in trimming a picnic shoulder is to remove any excess fat and skin. Using a sharp knife, carefully trim away the outer layer of fat, leaving a thin layer to enhance the flavor and juiciness of the meat. Be sure to remove any tough or chewy bits of skin that can affect the texture of the final dish.
Trimming the Bone and Cartilage
Once the fat and skin are removed, it’s time to focus on trimming the bone and cartilage. Carefully cut around the bone to remove any excess material, ensuring that the meat is evenly distributed. Trim away any tough cartilage or connective tissue to ensure a tender and flavorful result.
Tips for Achieving the Perfect Trim
To achieve the perfect trim on your picnic shoulder, remember to take your time and work methodically. Use long, smooth strokes with your knife to ensure even trimming and avoid jagged edges. Additionally, don’t be afraid to trim more than once to achieve the desired result. With practice and patience, you’ll soon master the art of trimming a picnic shoulder like a pro.
Tips and Tricks for Trimming a Picnic Shoulder
Avoiding Common Mistakes
When it comes to trimming a picnic shoulder, there are a few common mistakes that you’ll want to steer clear of. One of the most important things to remember is to not remove too much fat. While excess fat can impact the flavor and texture of the meat, a certain amount is necessary to keep the shoulder juicy and tender during cooking. Additionally, be cautious when trimming around the bone to avoid cutting into the meat unintentionally.
Enhancing Flavor and Tenderness
To elevate the flavor and tenderness of your picnic shoulder, consider marinating the meat before trimming. A simple marinade of herbs, spices, and acidic ingredients can help break down tough muscle fibers, resulting in a more tender and flavorful final dish. Furthermore, using a meat tenderizer tool can help soften the meat and enhance its overall texture. Don’t be afraid to get creative with your seasonings and marinades to truly make your picnic shoulder stand out.
Properly Storing Trimmed Picnic Shoulder
After you’ve trimmed your picnic shoulder, it’s important to store it properly to maintain its freshness and quality. Store the trimmed meat in an airtight container or sealed plastic bag in the refrigerator for up to three days. For longer storage, consider freezing the trimmed shoulder in a freezer-safe container or vacuum-sealed bag. When ready to cook, simply thaw the meat in the refrigerator overnight for optimal results.
Conclusion
In conclusion, mastering the art of trimming a picnic shoulder is a valuable skill that can elevate your cooking to new heights. By understanding the importance of trimming and following the step-by-step guide provided, you can ensure that your picnic shoulder is perfectly prepared for a delicious meal. Remember, the key to a tender, flavorful dish lies in the details, and proper trimming is a crucial step in achieving culinary excellence.
So, the next time you’re preparing a picnic shoulder for a gathering or a special meal, don’t overlook the trimming process. Take the time to remove excess fat, skin, and bone to unlock the full potential of this cut of meat. With the tips and tricks shared in this guide, you’ll be well on your way to creating a mouthwatering dish that will impress your family and friends. Happy cooking!